Guide to Modular Weaponry: различия между версиями
>StevIII м (Formatting) |
>StevIII (Basically just rewrites the main text body. I probably wrote this while drunk or something, it's terrible. I'll doublecheck things tomorrow.) |
||
| Строка 2: | Строка 2: | ||
{{toc_right}} | {{toc_right}} | ||
A portion of the job of | A portion of the job of Research and Development is the creation, development and testing of Modular Weaponry, by combing various components and checking them at a Weapons Analyser, and often running tests in the firing range. After they have been produced, they are [[Traitor|generally]] shipped off to Security, or kept in storage in Research for expeditions or self defense. | ||
==Guide to creating your first prototype== | ==Guide to creating your first prototype== | ||
| Строка 8: | Строка 8: | ||
To start construction on a prototype, the first thing you need to do is obtain a weapons analyzer. | To start construction on a prototype, the first thing you need to do is obtain a weapons analyzer. | ||
* Print a weapons analyzer board from the circuit imprinter | * Print a weapons analyzer board from the circuit imprinter | ||
* Steel | * Acquire Steel | ||
* Create a machine blueprint | * Create a machine blueprint | ||
* Left click it | * Left click it | ||
* Add cables | * Add cables | ||
* | * Add the Board | ||
* 1 capacitor | * Add 1 capacitor | ||
* 2 scanning modules | * Add 2 scanning modules | ||
* 1 console screen | * Add 1 console screen | ||
* Screwdriver. | * Finalise the process with a Screwdriver. | ||
You now have the amateur weapon-smith's | You now have the amateur weapon-smith's favourite toy. You can put in an assembly and add components, or even analyze a normal weapon like a pistol, or a screwdriver. | ||
Once your have your analyzer, | Once your have your analyzer, the process involves taking one item from each category of components, listed at the end of the page in Parts, plus an assembly, and add them all to the device. The order of additions is entirely irrelevant, save for the Modulator which finalises the process. As soon as you finalise the weapon, the interface will change and an affirmative sound will play, showing that you have finalised your weapon. | ||
During and after finalization, there are two screens in the analyzer. You have your assembly screen, and your finalized product screen. Both screens provide some valuable information | During and after finalization, there are two screens in the analyzer. You have your assembly screen, and your finalized product screen. Both screens provide some valuable information | ||
| Строка 27: | Строка 27: | ||
[[File:Assembly.png]] | [[File:Assembly.png]] | ||
During assembly, every single component has eight different stats. These stats | During assembly, every single component has eight different stats. These stats represent the actual stats of the finalized prototype. | ||
*''Reliability:'' The finalized number is the chance the weapon has to explode in your hands when fired. | *''Reliability:'' The finalized number is the chance the weapon has to explode in your hands when fired. Lenses and Capacitors increase the reliability, and all parts decrease or increase it minorly. | ||
*''Damage | *''Damage Modifier:'' A higher Damage Modifier equates to higher damage for the finalised weapon. | ||
*''Fire | *''Fire Delay Modifier:'' A higher Fire Delay Modifier equates to a longer downtime between shots. | ||
*''Number of | *''Number of Shots Modifier:'' This is normally only modified by a capacitor. The higher quality your capacity equates to more shots before requiring a recharge. | ||
*''Burst | *''Burst Modifier:'' A higher Burst Modifier equates to more shots fired for each triggerpull. | ||
*''Accuracy | *''Accuracy Modifier:'' A higher Accuracy Modifer equates to the likelihood you will make contact with the target of your attack. Components such as Stocks increase your accuracy, and others such as the Gatling Rotator decrease it. | ||
*''Repair | *''Repair Tool:'' The tool required to repair the component. | ||
===Prototype=== | ===Prototype=== | ||
| Строка 47: | Строка 47: | ||
[[File:Assembly2.png]] | [[File:Assembly2.png]] | ||
Once your prototype has been finalized by adding the modulator, the screen changes to include the data from the assembly screen, plus 11 extra sections. These sections are | Once your prototype has been finalized by adding the modulator, the screen changes to include the data from the assembly screen, plus 11 extra sections. These sections are as follows. | ||
*''Maximum Shots:'' | *''Maximum Shots:'' How many shots are stored in each charge. | ||
*''Burst:'' How many projectiles | *''Burst:'' How many projectiles are fired in each triggerpull. | ||
*''Self Recharge:'' | *''Self Recharge:'' Whether or not the gun self-recharges. | ||
*''Recharge Time:'' How long it takes to recharge. | *''Recharge Time:'' How long it takes to recharge. | ||
*''Reliability:'' The likelihood | *''Reliability:'' The likelihood a weapon will malfunction when used. This can be identified by a red warning message mentioning a Capacitor Overload. | ||
*''Projectiles | *''Projectiles Estimated Damage Rating:'' The damage of the projectile. | ||
*''Projectiles Damage Type:'' The type | *''Projectiles Damage Type:'' The damage type of the projectile. | ||
*''Projectiles Estimated Armor Penetration Rating:'' | *''Projectiles Estimated Armor Penetration Rating:'' How much armour the projectile can penetrate through. This is somewhat abstract unless you understand the armour ratings of various types of armour. | ||
*''Projectiles | *''Projectiles Armor Damage Type:'' The dammage type of the projectile versus armour. | ||
*''Projectiles Shrapnel Type:'' | *''Projectiles Shrapnel Type:'' Whether or not it fires shrapnel. | ||
*''Stun:'' Whether or not it stuns | *''Stun:'' Whether or not it stuns. | ||
<div class="toccolours mw-collapsible mw-collapsed" style="width:99%; background:#ffffff"> | <div class="toccolours mw-collapsible mw-collapsed" style="width:99%; background:#ffffff"> | ||
Версия от 18:27, 28 июня 2023
A portion of the job of Research and Development is the creation, development and testing of Modular Weaponry, by combing various components and checking them at a Weapons Analyser, and often running tests in the firing range. After they have been produced, they are generally shipped off to Security, or kept in storage in Research for expeditions or self defense.
Guide to creating your first prototype
To start construction on a prototype, the first thing you need to do is obtain a weapons analyzer.
- Print a weapons analyzer board from the circuit imprinter
- Acquire Steel
- Create a machine blueprint
- Left click it
- Add cables
- Add the Board
- Add 1 capacitor
- Add 2 scanning modules
- Add 1 console screen
- Finalise the process with a Screwdriver.
You now have the amateur weapon-smith's favourite toy. You can put in an assembly and add components, or even analyze a normal weapon like a pistol, or a screwdriver.
Once your have your analyzer, the process involves taking one item from each category of components, listed at the end of the page in Parts, plus an assembly, and add them all to the device. The order of additions is entirely irrelevant, save for the Modulator which finalises the process. As soon as you finalise the weapon, the interface will change and an affirmative sound will play, showing that you have finalised your weapon.
During and after finalization, there are two screens in the analyzer. You have your assembly screen, and your finalized product screen. Both screens provide some valuable information
Assembly
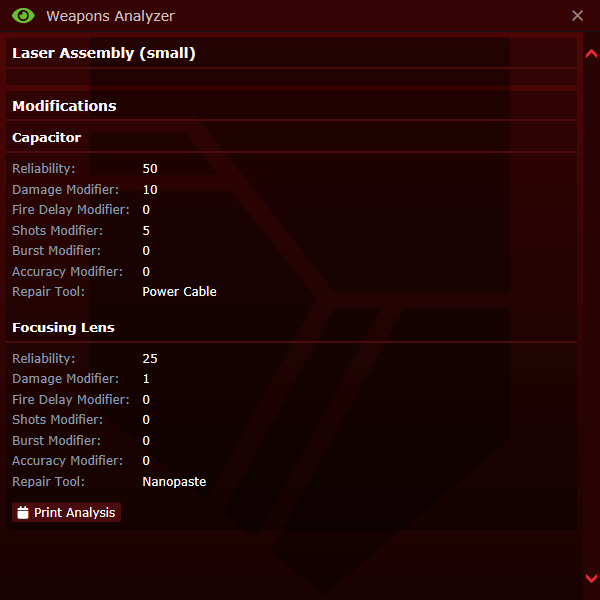
During assembly, every single component has eight different stats. These stats represent the actual stats of the finalized prototype.
- Reliability: The finalized number is the chance the weapon has to explode in your hands when fired. Lenses and Capacitors increase the reliability, and all parts decrease or increase it minorly.
- Damage Modifier: A higher Damage Modifier equates to higher damage for the finalised weapon.
- Fire Delay Modifier: A higher Fire Delay Modifier equates to a longer downtime between shots.
- Number of Shots Modifier: This is normally only modified by a capacitor. The higher quality your capacity equates to more shots before requiring a recharge.
- Burst Modifier: A higher Burst Modifier equates to more shots fired for each triggerpull.
- Accuracy Modifier: A higher Accuracy Modifer equates to the likelihood you will make contact with the target of your attack. Components such as Stocks increase your accuracy, and others such as the Gatling Rotator decrease it.
- Repair Tool: The tool required to repair the component.
Prototype
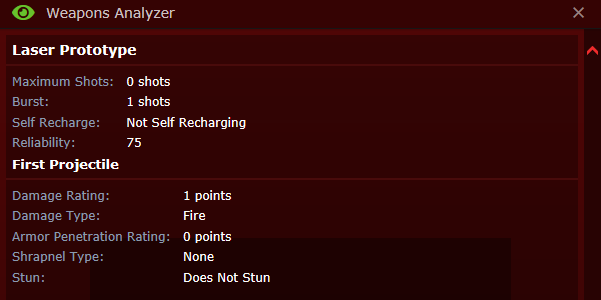
Once your prototype has been finalized by adding the modulator, the screen changes to include the data from the assembly screen, plus 11 extra sections. These sections are as follows.
- Maximum Shots: How many shots are stored in each charge.
- Burst: How many projectiles are fired in each triggerpull.
- Self Recharge: Whether or not the gun self-recharges.
- Recharge Time: How long it takes to recharge.
- Reliability: The likelihood a weapon will malfunction when used. This can be identified by a red warning message mentioning a Capacitor Overload.
- Projectiles Estimated Damage Rating: The damage of the projectile.
- Projectiles Damage Type: The damage type of the projectile.
- Projectiles Estimated Armor Penetration Rating: How much armour the projectile can penetrate through. This is somewhat abstract unless you understand the armour ratings of various types of armour.
- Projectiles Armor Damage Type: The dammage type of the projectile versus armour.
- Projectiles Shrapnel Type: Whether or not it fires shrapnel.
- Stun: Whether or not it stuns.
Parts
Assemblies
  Small Laser Assembly (2000 steel)
  Medium Laser Assembly (4000 steel)
  Large Laser Assembly (8000 steel)
Barrels
  Reinforced Barrel (3000 steel)
  Nano-Reinforced barrel (5000 steel)
Capacitors
  Capacitor (1000 steel)
  Starch Capacitor (1000 steel)
  Reinforced Capacitor (4000 steel)
  Uranium-Enriched Capacitor (4000 steel, 1000 uranium)
  Terranium-Enriched Capacitor (4000 steel, 1000 glass, 500 uranium)
  Phoron-Enriched Capacitor (4000 steel, 3000 solid phoron, 500 uranium)
  Bluespace-Enriched Capacitor (4000 steel, 3000 solid phoron, 500 uranium, 1000 diamond)
Capacitor addition
  Surge protector (5000 steel, 1000 glass)
  Pulser (5000 steel, 1000 glass)
  Auxiliary Capacitor (5000 steel, 1000 glass)
  Capacitor Overcharge (5000 steel, 1000 glass)
  Gatling Rotater (750 steel, 3000 glass, 2000 solid phoron, 2000 silver, 1000 diamond)
Lenses
  Focusing Lens (500 steel, 2000 glass)
  Splitter Lens (750 steel, 2000 glass)
  Precise Lens (750 steel, 2000 glass)
  Reinforced Lens (2000 steel, 1000 glass)
Barrel addition
  Energy Suppressor (2000 steel)
  Telescopic Sight (1000 steel, 500 glass)
  Exhaust Venting (3000 steel)
  Stability Stock (5000 steel)
  Improved Stock (3000 steel)
  Bayonet (3000 steel)
  Energy Bayonet (3000 steel, 500 silver, 500 solid phoron)
  Enhanced Grip (3000 steel)
  Enhanced Grip MK2 (5000 steel)
Modulators
  TASER Modulator (4000 steel)
  Tesla Modulator (4000 steel, 1000 silver, 2000 solid phoron)
  Ion Modulator (750 steel, 500 glass, 2000 solid phoron)
  Floral Somatomodulator (1000 steel, 250 glass, 250 uranium)
  Betaray Modulator (1000 steel, 250 glass, 250 uranium)
  Arodentia Modulator (2000 steel, 1000 glass, 500 uranium)
  Red Team Modulator (2000 steel)
  Blue Team Modulator (2000 steel)
  Omni Team Modulator (2000 steel)
  Practice Beam Modulator (2000 steel)
  Decloner Modulator (5000 steel, 1000 glass, 3000 solid phoron)
  Dart modulator (5000 steel, 1000 glass, 3000 solid phoron)
  Blaster-Bolt Modulator (8000 steel, 2000 glass, 6000 solid phoron)
  Laser Modulator (750 steel, 500 glass, 1000 solid phoron)
  Phoron Bolt Modulator (2500 steel, 1000 glass, 2000 solid phoron)
  Energy Net Modulator(5000 steel, 1000 glass, 3000 solid phoron)
Research Department
| |
| Head of department | Research Director |
| Personnel | Scientist - Xenobiologist - Xenoarcheologist - Roboticist |
| Useful guides | Guide to Research and Development - Guide to Xenobiology - Guide to Xenobotany - Guide to Xenoarchaeology - Integrated Electronics - Guide to Telescience - Guide to Modular Weaponry |

