Участник:Cnaym/Sandbox2
For the aspiring Roboticist, this guide will explain the creation and maintenance of Cyborg, Bots, and Exosuits, as well as the repair of IPCs.
Robotics Equipment
Machines
Exosuit Fabricator

The Exosuit Fabricator is your main construction machine, you feed materials into it, and it builds all the things you could possibly need. It can make prosthetic limbs, cyborg parts and internal components, exosuit parts, exosuit equipment modules, and a variety of useful miscellaneous items like power cells. It has a vast variety of blueprints available to start, but certain advanced things must be unlocked by raising your research levels. These will be explained later.
In addition, the machine itself will also be upgraded by simply researching two specific techs. These benefits have no cap, and will continue to have a benefit at any increased research level (The levels themselves are capped by the availability of high tech items to research)
- Materials research will increase material efficiency, reducing the quantity of materials you require to build things.
- Data Theory research will increase speed efficiency, reducing the time required to build various parts
It can be upgraded
- Upgrading the Laser will increase material efficiency, reducing the quantity of materials you require to build things.
- Upgrading the Manipulators will increase speed efficiency, reducing the time required to build various parts
- Upgrading the Matter Bins will allow it to store more materials
Cyborgs
See also Cyborgification Contracts. These contracts are important - without a signed, stamped contract, making a man into a machine is technically murder - no matter how much he wants it!
The Cyborg is the Roboticist's primary creation and upkeep. They are tasked with helping the station's inhabitants in their daily life and trying to kill everyone when the AI is insane. Each cyborg is required to follow the AI's laws, and may choose one of the AIs in the event that more than one exists.
Making a Cyborg
- Fill the
 Exosuit Fabricator with as much
  metal as it will hold.
 - Click on the Exosuit Fabricator to open its menu. Select Add To Queue for Robot Endoskeleton, Left Arm, Right Arm, Left Leg, Right Leg, Torso, and Head then click on Process Queue in the right side.
- Wait for a few minutes for the pieces to be built. You will likely need to add additional metal to the Fabricator in order for it to finish.
- When putting the parts together, use the
 Robot Endoskeleton as a base. Attach components by picking them up and then clicking on the endoskeleton.
- The last step is installing either an
 MMI or a
  posibrain.
Extract a brain for the Cyborg
Note: Check with the Chief Medical Officer before agreeing to perform a brain extraction on a living human. Medbay has anesthetics, which are optimal when someone is cutting into your skull with a circular saw. Additionally, it will clear up bookkeeping problems regarding the addition of a new cadaver in the morgue.
- (Optional) Complete Prepping for Surgery.
- Aim for the organ's location in the
 Damage Zone. (Head for brain/eyes, chest for heart/liver/lungs, groin for appendix/kidney)
 - Use a
 scalpel to cut back the flesh.
 - Use the
 hemostat to stop any potential bleeding.
 - Use your
 retractors to lift up the skin.
 - Use the
 saw to cut through the bones.
 - Use the
 retractor to separate the bones.
 - Use the
 scalpel. This will open up a window asking you which organ you'd like to cut loose. Select the Brain.
 - Use the
 hemostat. This will open up a window asking you which loose organ you'd like to remove. Select the Brain again.
 - Place the brain in an
 MMI.
MMI. - (Optional) Before you give the Cyborg a new brain, you can name it anything you or your client wants. Grab a
 pen and use the pen on the Cyborg to rename it. Once you place the brain in the Cyborg, this step will not be completable.
 - Carry the
 MMI over to your finished Cyborg construct that you made before, and click on it to add the brain into the Cyborg.
You can also use a normal table instead of an operating table, but this has a chance of missing one third of the time.
So You Decapitated Your Patient
Don't panic just yet! You can still complete the brain extraction. It's actually easier then extracting the brain from an attached head. Use a ![]() scalpel, then a
scalpel, then a ![]() retractor, then a
retractor, then a ![]() hemostat.
hemostat.
Cyborg Maintenance
You'll often have Cyborgs run up to you with any number of problems. Here's how to deal with them most of the time.
Repair
When Cyborgs get dented, they'll come to you for repairs. Luckily, most repairs are simple
- Equip a
 welding helmet on your head.
- Note: Be sure to remember this step or you could go blind!
- Place a
 welder in your hand, click on it while it's in your hand to light it, then click on the Cyborg repeatedly to repair it. Engineer cyborgs can also repair themselves and other cyborgs like this.
Occasionally Cyborgs are inflicted by more advanced damage that hurts their internal wiring. If this is the case:
 Swipe an ID with Robotics access to unlock the panel.
 Crowbar open the panel.
 Remove the cyborg's power cell by clicking on it with an empty hand.
 Use a screwdriver to expose the wires.
 Use a cable coil to replace damaged wires.
 Screwdriver the cyborg to unexpose the wires.
 Crowbar the panel shut.
 Swipe an ID with Robotics access to relock the cover.
Cyborg Component Repair
Sometimes robots will have damaged components that need to be removed and replaced. Removing them is pretty straightforward.
 Swipe an ID with Robotics access to unlock the panel.
 Crowbar open the panel.
 Remove the cyborg's power cell by clicking on it with an empty hand.
 Use a screwdriver to expose the wires.
 Crowbar out the desired component.
Occasionally a robot will be so damaged that only the brain is salvageable, or perhaps it's volunteering for an AI core. You can remove the brain by following these steps.
Human Prosthetic Repair
You may be asked to repair damage to the artificial limbs of your fellow crew members.
Upgrading the Power Cell
Cyborgs that start when the game starts will likely come straight to you for an upgrade in the first few minutes of the game.
Help them out by upgrading their power cell, which will lessen the amount of time they need to visit the recharging station. Click on the Cyborg with the following items (in order):
 Swipe an ID with Robotics access to unlock the panel.
 Crowbar open the panel.
- Click on the Cyborg with an
 empty hand to take out the
  power cell and replace it with the higher-capacity power cell.
- Note: The default power cell capacity in Cyborgs is 7,500. All of the power cells you find in your office should be at least 15,000, and the Science Department can research power cells that exceed 30,000.
 Crowbar the panel shut.
 Swipe an ID with Robotics access to relock the cover.
Modules
Once a player Cyborg chooses a module (Engineer, Janitor, Security, etc) they cannot change the module without your help.
You can manually reset its module to allow it the option of choosing a new one by following this order:
This also works with any other module - just replace the "reset module" with the module of your choosing.
Modifications
Cyborgs that have had their programming tampered with can be repaired by resetting their AI connection and LawSync status, by manually pulsing the wiring.
In the unlikely event that an AI goes crazy, a trained Roboticist or other technician should be able to sever the connection to the AI entirely by cutting the correct wire.
There are three lights in the cyborg with three corresponding wires:
- LawSync: If this light is on, it means that any laws uploaded to the AI are also uploaded to the cyborg. The cyborg cannot be given different laws to the AI as long as this is on. This light will turn off if the AI Link light is off, regardless of wire status.
- Pulsing does nothing.
- Cutting will do nothing, as long as the AI link light is on. If the AI link light is off, cutting and then turning the AI link back on will cause the cyborg to be slaved to an AI, but not synced with it's laws.
- Mending this wire will turn the LawSync light back on as long as the AI link light is also on. The cyborg will then resume syncing with the AI's laws. If the AI link light is off, mending this will turn the light on, only for it to turn off again.
- AI Link: If this light is on, it shows that the Cyborg is slaved to an AI and must follow that AI's orders.
- Pulsing this wire allows you to pick an AI for the cyborg to be slaved to if there are multiple AIs. If there is only one AI, pulsing this will simply turn it on and slave the cyborg to it, if it is off.
- Cutting this wire will cause the Cyborg to be unslaved from the AI and bound only by it's laws. This also turns off LawSync, as the cyborg has no AI to sync to.
- Mending this wire does nothing. You need to pulse it to reconnect it to an AI.
- Module Lock: If this light is on, the module of the cyborg cannot be changed.
- Pulsing this will reset the module of a cyborg and allow it to pick a new one.
- Cutting this wire will cause the cyborg to be locked to the standard module and be unable to change or use any items. They can still remote control devices however.
- Mending this wire will allow the cyborg to change modules.
An emagged cyborg will have no LawSync or AI link and cannot be reset.
Remember, cyborgs are very expensive! Do not destroy them unless the cyborg is completely out of control, and resetting the AI and LawSync status doesn't work.
Creating a Spiderbot
Spiderbots are temporary bodies for brains.
They can carry around small items, zap things, move through vents and generally act like pests. They are seldom used on the Aurora, but can still be constructed.
Combine the following:
- Robot head.
- Manipulator.
- Occupied MMI or positronic brain.
IPCs
Sometimes, you will need to repair synthetics other than Cyborgs, such as IPCs. The procedures for repairing an IPC are quite different from that of cyborgs, and are as follows:
Opening and Closing Surgical Sites
The first and last steps of most repairs.
Exterior repair
In the case that any damage is only external (Anything less than "Severe" or "A lot of"), damage can be repaired.
Advanced interior repair
IPCs possess their own set of internal organs, the locations and identities of which are as follows (Organs with their name in bold are vital - removing it will kill the IPC!):
- Microbattery - chest
- Optical sensor - head
- IPC identification tag - head
- Positronic brain - head (NOTE: Removing this will only kill the IPC chassis, not the posibrain itself. The brain will function like a normal posibrain.)
Organ repair
Organ removal
While targeting the organ's parent limb:
 Open the limb's hatch using a screwdriver.
 Pry open the hatch using a crowbar.
- Файл:Multitool.png Decouple the target organ (you can choose if there are multiple) using a multitool. NOTE: It may take multiple clicks before it works.
 Remove the target organ with the hemostat
 Close and secure the hatch using a crowbar.
Organ attachment
Positronic brain installation
Voice mending surgery
Helping a poor Shell sing again! While targeting the Shells' mouth.
 To open the Shells' Synthskin face and reveal the neck.
- Файл:Multitool.png or
 To mend the voice modulator.
  To bend the Shells' Synthskin face and neck back into place.
IPC revival
Time to bring a dead robot back to life: While targeting the head:
 Open the head's hatch using a screwdriver.
 Pry open the hatch using a crowbar.
- Файл:Multitool.png Decouple the Positronic brain.
 Remove the brain with the hemostat.
 Create a full cyborg chassis.
- The IPC's species depends on the brand of the torso. Different brands can be ordered through cargo.
- Файл:Multitool.png Use the multitool on the head to disable the law manager.
- Build a cyborg and follow the steps above.
Bots
As a Roboticist, you serve another important purpose, making NPC robots. Robots can benefit the station in many ways, and are really easy to create. The current list of robots, and how to make them, is as follows:
 Medibot
These will only inject chemicals if the chemical helps with the target's damage by default.
They can also be Emagged to repeatedly inject anyone with harmful chemicals. Note that these don't synthesise their own chemicals, except tricordazine.
Combine the following ingredients in order:
 Cleanbot
Cleanbots are great, as they serve the exact same purpose as the Janitor.
Even better is that it uses Space Cleaner to mop, so no slipping on everything!
 bucket (Grab it from the Janitor or make with Autolathe)
 proximity sensor.
- (Optional) Name the bot with a
 pen.
pen. - Cyborg Right or Left Arm.
 Floorbot
Floorbots are nice to have around when some asshole starts crowbarring up floor tiles or some traitor has blown apart a section of the station.
They zoom around and repair busted floor tiles. To make:
- Empty
 toolbox (Must be a blue one)
  Floor tile (click on a stack of metal while it's in your hand to open a menu for making these)
 proximity sensor.
- (Optional) Name the bot with a
 pen.
pen. - Cyborg Right or Left Arm.
Keep in mind that Floorbots have a limited number of floor tiles. This number can be observed by popping up their control panel.
 Securitron
Basically, Officer Beepsky without the personality.
You usually won't need to build any of these, but they can be hilariously helpful for traitors whom have invested in a Electromagnetic Card (E-mag), as they tend to run around stunning and cuffing everyone in sight. Problem is, any of these that report a Level 10 Infraction when spotting people are obviously hacked. To make:
 Use a Screwdriver on a
  Remote Signaling Device
- Combine with a
 Helmet (Get these from Security)
  Weld them together
- Add a
 Proximity Sensor and a Robot Arm.
 - Toss in a
 Stun Baton
Note that destroying a Securitron or Officer Beepsky with a melee weapon is all but impossible by yourself; striking them causes them to immediately stun and cuff you. If you work with another person you can get several hits in while it is cuffing the other person, which is often enough to destroy it outright.
 ED-209
Beepsky's bigger brother.
Has all of the abilities of a standard Securitron with the addition of a ranged attack. To make:
- Use a
 metal sheet on a Cyborg Endoskeleton to reinforce it.
 - Add two Robot Legs and a Файл:Armor.pngsecurity vest.
 Weld everything together
- Add in a security
 Helmet
 - Attach a
 Proximity Sensor to the assembly
 - Insert wires
- Add a
 Taser and attach it with a
  Screwdriver.
 - Insert a
 Power cell. Your own murder-robot is complete!
A emagged ED-209 fires deadly lasers AND attacks anyone on sight. Anyone emagging a ED-209 is advised to run like crazy.
Exosuits
Construction of exosuits are restricted by ID, so they are typically the product of roboticists and the Research Director. These can be tremendously helpful or tremendously annoying depending on who uses it. They take more work to make than robots and require special circuits, which are obtained through the Quartermaster or the Research and Development console.
Exosuits are wholly modular, meaning what you make can (mostly) be mixed and matched to create whatever vehicle you desire. From chicken-legged brawling mecha to tread-based taxis, the possibilities are endless.
The current list of exosuit parts is as follows.
Exosuit Construction
 The Frame
The backbone of the mech itself, this can be modified at any stage of construction.
To finish:
- Apply 15 steel sheets to the frame.
- Wrench the steel sheets in place.
- Weld the steel sheets in place.
- Wire the frame.
- Wire cutters to neaten the wiring.
- The following is the limitation and requirement for the frame's finished parts :
- - Motivators
- - Sensors
- - Manipulators
- - Chassis
- Once it's all applied, screwdriver to complete.
 The Parts
The actual defining features of the mech, appearance and performance wise. Each part has unique attributes that make them superior or inferior to the other parts, depending on situation.
Individual parts of the mech require various, smaller parts from the mech fabricator to finish. Robot parts are found under the "robot" tab specifically, not the exosuit tab itself.
To finish the motivators and manipulators:
- Apply one robot actuator.
To finish the sensors:
- Apply one robot camera.
- Apply one robot radio.
- Apply one exosuit control module, this is among the most important parts of the mech.
To finish the chassis:
- Apply the exosuit armor of your choice. This is very important as it judges the durability of your mech.
- Apply one power cell of your choice.
- Apply one robot diagnostic unit.
- Once it's all done, place the parts on the mech frame.
The Exosuit Control Module
The Exosuit Control Module takes very specific boards, but only two of any variety. This marks the limitation for modules that mecha can use. Theoretically, any mech can be used for any purpose with this system. The boards can be seen below.
- Basic Weapon Control - Controls the majority of weapons found in the exosuit fabricator. Without it, none of these can be utilized.
- Advanced Weapon Control - Controls the higher-end weaponry, such as X-RAYs and pulse cannons. Doesn't work for basic weapons without also using the basic weapon board.
- Utility Systems Control - Controls almost every utility system, such as clamps, drills and floodlights.
- Engineering Systems Control - Controls engineering systems such as the mounted RFD or fire extinguisher.
- Medical Systems Control - Controls medical systems such as sleepers, health analyzers and crisis drones.
 The Details
The specifics on each frame available to robotics.
Exosuit Frames
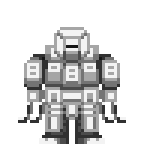 Powerloader - Parts for an industrial-grade power loader. The modular mecha adaptation of the APLU "Ripley," tends to be utilized for mining and heavy lifting.
- Has decent armor across the board.
- Has an open chassis, not protected against the environment. Can carry two people inside of it.
- Powerful, heavy manipulators with substantial damage per swing.
- Slow and bulky but hard to damage motivators.
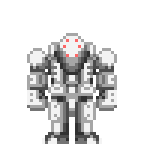 Light Chassis - Parts for a light, maneuverable and fragile mech. The modular mecha adaptation of the Odysseus, tends to be utilized for medical response and scouting.
- Has terrible armor, generally.
- Has a sealed chassis, protected from the environment.
- Light, nigh harmless manipulators that are unable to damage windows or doors.
- Fast and agile motivators basically made of glass.
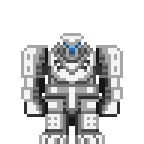 Heavy Chassis - Parts for an absurdly large, heavy-duty mech. The modular mecha adaptation of the Durand, tends to be utilized for really big problem solving.
- Has phenomenal armor, generally.
- Has a sealed chassis, protected from the environment.
- Extremely heavy and equally slow motivators.
- The heaviest duty manipulators available, presumably carries the impact of a train.
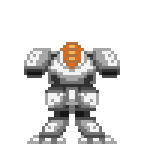 Combat Chassis - Parts for a well-balanced combat mech. The modular mecha adaptation of the Gygax, tends to be utilized for dynamic combat situations.
- Has relatively good armor.
- Has a sealed chassis, protected from the environment.
- Moderately armored motivators, still quite fast.
- Quick, but light manipulators that don't have much force behind them.
Miscellaneous Parts
- Armored Treads - The fastest traditionally available motivators, very durable with terrible turning delay. Not good for maneuverable mechs, but great for straight lines.
- Hover Thrusters - A set of thruster motivators that permit flight and the total disregard of holes.
- Quadruped Motivators - A set of stable motivators that permit the scaling of walls and have instant turn speed.
- Spherical Pod Chassis - A spherical hoverpod chassis, in modular mech form! About as useless as its predecessor and only a little prettier.
Exosuit Armor
 Armor - The armor of your mech determines a plethora of things and can be changed depending on the specialty you expect for your mech. Some available are listed below.
- Basic exosuit armor - Simple enough, durable armor with no special attributes.
- Radiation-proof armor - Exactly what the name says, this will protect the user entirely from the threat of radiation.
- EM-resistant armor - EMP proofing, for your mech in effect.
- Combat armor - Extremely durable without the special attributes of the former plating.
 The Equipment
The wielded equipment, utilities and weapons of the mech available to robotics.
Weapons
- Electro-laser carbine - An electrode-based taser that doesn't pass through windows but does a mighty amount of pain to whoever it hits.
- Heavy Ion Cannon - A mech-mounted duplicate of the ion rifle. Two modes : stun, and lethal. Stun has ten shots, lethal has six. Can't be fitted onto shoulder slots.
- Mounted laser carbine - A laser rifle fitted onto a mech. Ten shots, all lethal. Can't be fitted onto shoulder slots.
- Mounted machine gun - A very robust ballistic autocannon for mech usage, very lethal.
Utilities
- Mounted Clamp - A sturdy clamp that can carry pretty much anything that isn't bolted down. Great for securely moving loaded crates. When loaded with an ore box, this automatically picks up anything you drill.
- Mounted Drill - A drill with an interchangeable head that excels at destroying pretty much anything in the game, from rocks to killer monsters to people to rocks again. More efficient the harder the head's material is.
- Floodlight - Very bright headlamps for exosuit mounting. Wonderful for just about any mech.
- Mounted Plasma Cutter - A robust plasma cutter for mech usage.
- Gravitational Catapult - A grav-pult with two modes ; area, and targeted selection. Utilizing either, you're able to push, pull or shove any object not bolted down.
Engineering
- Mounted RFD - An RFD with three modes ; construct wall/plating, deconstruct wall/plating/airlock, and construct airlock.
- Extinguisher - A very high capacity fire extinguisher.
Medical
- Mounted sleeper - A sleeper that permits the operator to scoop up people quickly, it's also fitted onto the back of the mech and comes with a variety of beneficial chemicals.
- Health analyzer - A health analyzer. That's it.
- Crisis Drone - Automatically attempts to stabilize people nearby when activated.
 Mech Piloting
Simple tips to piloting your new death robot.
Basics
Mechs are pretty much larger versions of your own character in operation, meaning that, mechanically speaking (not RP wise) it's as simple as utilizing normal hotkeys once you've climbed into the mech to navigate.
To climb into the mech, drag your character's sprite onto the mech. Provided the canopy is open, you'll simply enter the mech after a brief delay. Any action will interrupt this process, especially being knocked over or pushed.
If the hatch/canopy/roll cage/etc. is closed, simply click on the mecha itself to swing it open.
Once you're inside, you ought to have full access to your inventory with the exception of using some items, using RIG modules, etc.
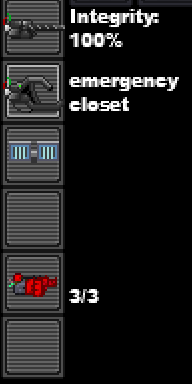
The interface of the mech starts here. This is where basic functions are controlled.
- The MAINT button toggles the maintenance protocol on/off. Maintenance protocol permits the manipulation/deconstruction of the completed mecha, regardless of the presence of a pilot.
- The EJECT button ejects you, provided the canopy is unlocked.
- The CLEAR button toggles the hardpoint access system, permitting or forbidding editing of hardpoints from outside of the mech.
- The LOCK button locks the canopy once it's closed.
- The CLOSE/OPEN button opens/closes the canopy.
- The RADIO button permits configuration of the exosuit's internal radio.
- The CAMERA button does god-knows-what.
- The RENAME button permits the relabeling of the exosuit to whatever hilarious or cool thing you can come up with.
The next part of the exosuit interface is seen here. Basically, clicking on the background of the icon in question permits you to select the specific module that occupies that slot. Alt+clicking on the icon activates one of its utilities, like setting something to burst fire or dropping something from a clamp. Ctrl+clicking on the icon's background will eject the module entirely from your mech. To the right of this, ammunition/drill integrity/clamp contents can be seen.
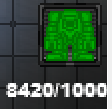
The final piece is seen here, this displays the integrity of your mech. Damage will display on various specific parts, like motivators/manipulators/sensors/etc as it comes.
Repairing Your Mech
Repairing a mech is a complex procedure, one that tends to involve activating maintenance protocols, wrenching the frame to dismantle it, and taking it apart piece by piece to fix the parts. Welder+wire will be needed in excess to fix damaged parts, and at higher damage thresholds, entire components will require replacement. This makes field repair of mechs rather difficult without a lot of spare parts on hand, so mechs aren't that sustainable running about aimlessly.
Replacing the Cell
Replacing the cell of a mech is simple - just crowbar it out with maintenance protocols enabled, and place a new (hopefully charged) one inside.
 Remote Piloting
How to setup a remotely controlled mech.
Requirements
Simply follow the steps above to create your own mech. Take it for a test ride and make sure it is charged. Parking it on a charger will ensure it remains charged until it is actually needed.
- Remote control upgrade
Those can be printed via the integrated circuit printer. You can get one of those from your friendly scientist over at R&D. They come in three forms, which respond to three different control networks: Standard for public use, penal to be used in prison work programs for the mines and AI to be controlled by the station intelligence. It can only be attached to a fully working mech and cannot be removed. Only if the mech and control chair are on the same network will you be able to pilot your Mech from it.
- Linked remote control chair
You will need a mech control center assembly kit, which can be printed on the protolathe in R&D. It can be deployed anywhere and moved by using your wrench on it. Entering the chair will give you a list of all mechs connected to the corresponding network. You are able to control the mech as long as you remain within the chair itself.
Hardsuits
Файл:Amisuit.png

 Civilian Hardsuit Assembly
- Cable
- Wirecutters
- Control circuit board
- Screwdriver
- Steel
- Wrench
- Welding tool
Combat Hardsuit Assembly
- Cable
- Wirecutters
- Central circuit board
- Screwdriver
- Control circuit board
- Screwdriver
- Advanced scanning module
- Screwdriver
- Steel
- Wrench
- Welding tool
- Plasteel
- Wrench
- Welding tool
Research Department
| |
| Head of department | Research Director |
| Personnel | Scientist - Xenobiologist - Xenoarcheologist - Roboticist |
| Useful guides | Guide to Research and Development - Guide to Xenobiology - Guide to Xenobotany - Guide to Xenoarchaeology - Integrated Electronics - Guide to Telescience - Guide to Modular Weaponry |


